Showing posts with label Altenew. Show all posts

10.25.2024

AECP - Let It Shine!


Hi friends!

Wishing you a wonderful start to your weekend!


Today, I'm excited to share my completed card for the next course 

in the AECP Altenew Academy Level 1 journey!

This exciting and glittery course was taught by the talented

Carissa Wiley and it's called Let It Shine!

She is truly Queen of Sparkle!


My card was so incredible fun to create and the good kind of messy.

I started with the set Bountiful Bouquet from Altenew 

and stamped/die cut directly onto a mixed media panel.

The panel was created by using the super fun Lindy's Magicals

including the Halloween set.


I loved the organic look to the panel and it has so much shimmer

and shine when it moves around in the light.


"Don't overlook embossing when adding shine!"

I love this tip from Carissa!

I had just received an order which included the 

Gold glitter cardstock - gilded set and it was perfect for the sentiment!

I die cut the Thank You using the Timeless Sentiments die set

and the gold shimmer helps to pick up the shimmer in the paint.


"Images have a beautiful shimmer with a dark background"

I chose a dark green cardstock from Stampin' Up 

 to compliment the rose/gold tones in the floral image.

 For the final glitz, I added some flecks of metallic paint

to the background of the cardstock to highlight the gold

and a few enamel golden dots sprinkled around.


One finally look, my supervisor has given her PAW-proval!


Thanks for stopping by!

~Kelly

8.07.2024

AECP ~ Easy Die Cutting Technique


 Hi friends!


I'm back with another card creation from the Altenew Academy

AECP ~ Easy Die Cutting Techniques!


For my card today, I'll share how and which Altenew products I used,

and what stood out for me the most with this class technique.

This card is so vibrant and zesty and cheerful!

The class is taught by the amazing Yana Smakula

and she highlights several techniques using die cuts.

The Moroccan Lattice Cover Die is stunning as a background to a card

but on this card, I used the die cut as a stencil - two ways!


 I started this card with the Zesty Life complete bundle 

stamp/die/stencil set from Altenew.

The layering stencils make this such a fun and effortless process!

The images are stamped with Altenew Permanent Black Ink

and die cut with the Zesty Life outline dies

and I did all my ink blending for the stencils with the Stamp Wheel.


The kraft cardstock was run through the die cut machine 

to give a base layer piece.  

Using the Stamp Wheel, I lined it up on top of white cardstock

and blended ink directly through the paper 'die cut' stencil.

I used a heavy hand to get a bolder look

but with the leftover ink only in the brush, 

I made a second background with another cardstock base.

Once it was stenciled, I splattered the bolder one with white paint

for a little extra drama!


One thing that stood out for me in the class is arrangement.

Sometimes foe me, it's an instant feel 

and other times it's trial and error, much like this card. 

 I second guessed where and how to put the 

lemons several times - and then it was the sentiment!

Finally, it mostly made sense and I love that Yana reminds us

to keep the 'stencils' ~ you can use them over and over!


Here's a final look at my encouragement card!

Interestingly enough, that's an actual Key Lime tree behind the card,

growing in our yard with fruit abundant!


Thanks for stopping by!

Happy crafting,

Kelly


7.29.2024

AECP ~ Clean and Simple Boutique Card class


 Hi friends!


Today's card share is a series for the AECP

Altenew Academy Clean and Simple Boutique Cards class

taught by Jennifer Rzasa.

My first takeaway from the class:

Make clean and simple cards that skip instead of walking!


I'm sharing 3 cards from this class

and I'll share with you the stamps, dies and supplies 

that I used for each of the cards.

Clean and simple cards tend to be one layer, minimalistic

but they can still say Va Va Voom with some extra attention to detail!


CARD 1


For this card, I used Altenew crafting essentials clear stamp

and colored it with Altenew alcohol markers.

I stamped the image with permanent black ink

and then stamped out a second stamp set ~ A Splash of Color

and layered the stamps to create a bit of drama!


CARD 2


For the second card, I continued the A Splash of Color stamping

and used a variety of crisp dye inks.

I used the Seashore and Tropical Forest collections

as well as stamping the sentiment with permanent black pigment ink.

And the Altenew Stamp Wheel is a game changer for multiple

stamping with smaller clear stamps that overlap!


CARD 3


For this card, the clean and simple look is layering

and loosely lining the Graphic Brushstrokes clear stamp set.

I stamped directly to the cardstock with a variety of inks

and used the permanent black pigment ink for the sentiment.


Here they are together at a glance!

This class was a wonderful demonstration for me to remember

the clean and simple approach to cards.

I am a layers and dimension girl by nature so it was a nice to 

take a leisurely time watching the demos and videos,

searching through my vast collection of Altenew stamps and deciding 

which ones to showxase for the Clean and Simple Boutique Cards!

Thank you, Jennifer, for a wonderful class and your inspiratiion!

One final glance 

Until next time!

Thanks for stopping by today :)

~Kelly

7.20.2024

AECP ~ Easy Ink Blending Techniques!

Hi friends!

I hope you are having a beautiful weekend!


Today I'm sharing a card from the Altenew classes

AECP - 

This class has a focus on using and understanding the Altenew 

alcohol markers as a medium and it's taught by Amy Lee.

Blending with markers showcases really well with florals

and one highlight she mentions is dark to light gives depth to 

what you're coloring as well as a shadow effect.

CARD #1


I used Bountiful Bouquet which is a very large stamp set

and so versatile - as you can see from my 3 samples here!

The markers give a great way to add detail that isn't there as well.

I noticed a few spaces that needed a little emphasis

but rather than reach for a black fineliner to draw in the lines,

I let the markers do the magic!

CARD #2


I loved this card and techique that I created 2 more

(perfect for the Get Well hop on Instagram for 3 way cardmaking!)

For this one, I added splatters of white acrylic paint

for a little more character as well as splatter in the background

in the matching ink color to the markers.

CARD #3


For this card, I took the same floral stamp

and used a paper trimmer to cut it almost right down the middle. 

Side by side, these cards are a mirror image.

These will be perfect for a Get Well, Get Better, Thinking of You theme!


Happy to be a:


Thanks for stopping by!

~Kelly
 

1.03.2024

Once more in '24!


Hi friends!


It's the time of year where I debut my FAVORITE personal challenge - 

One Plus Twelve!


This is the 6th year of my card challenge 

where I take ONE stamp (and only one stamp!)

and make a card TWELVE times (once a month on the 3rd).


The idea is came to me in the middle of the night

(where my best ideas always pop up!)

for a way to stretch the use of our supplies

Often, I'd buy and use a stamp - just once -

so this is a way to creatively use them again, twelve different ways.


For 2024, I chose Wildflowers by Pink and Main :)

I love flowers picked right out of the wild

and I love the wonder of the versatility of this set!


                 I used my Altenew half pans to watercolor a panel 

in bright, cheerful colors. 

Once dry, I stamped the wildflower stamp 

and ran it through my die cutting machine.

 I added it to a solid white embossed background 

and popped up a Tim Holtz label maker sentiment and dots.


My friends Barb and Jeanette are joining me

again this year in the challenge 

as we have done for the past 6 years.

This year, I decided to call One Plus Twelve 

by a cute catch phrase for 2024

Once More in '24 ...

every month on the 3rd!


Thanks for stopping by!

~Kelly


8.18.2022

CCEE2232 ~ National Peach Month!


   Hi friends!

    You're a peach!

And so is the month of August :)


There's a new challenge at the CCEE Stampers blog

with our hostess, Frances and this is her challenge!


Apparently August is Peach month and Monday 22nd August is National Peach Day, 

so for our challenge this week create a card that features one or more things

 that begin with the letter "P" .. 

A punched image; patterned paper; pansy; paint; person 

or a product that is from a company whose name starts with “P”.


Wow that is a lot of P's but creative enough that I'm sure 

you'll find something in your crafty stash to play along!


For my card, I used a stamp from Pink Fresh Studio

as well as as Paint (watercolor) for my image and background.

I also used Peaches and Cream cardstock (Fun Stampers Journey)

and Peach colored enamel dots (Altenew).


Be sure to head over to the CCEE Stampers blog

and check out all the DT cards

as well as link up yours, too!


Thanks for stopping by!

~Kelly

1.25.2022

Stamping Sisters Camp - Day 2!


Hi there, friends!


Welcome to day #2 of the Stamping Sisters winter camp.

That means all 4 of us

(Barb, Darlene, Jeanette and myself)

will bring you a different class / card technique each day this week.


Today, I'm the camp counselor

and I call this cardmaking idea 

"Let's get RIPPED!" :)


This is a photo heavy post but if you'd like to see the video version,

feel free to click on my YouTube channel video here


The first thing you'll need is some cardstock - 

both an a2 size base and a quarter panel for the base layer

and 2 sheets of WHITE tissue paper.


You'll need solid stamps and a couple colors of inks.  

Cubes are great since you'll be working in small spaces, nooks n crannies!


Once the images are all stamped out, let them dry for a minute or two.

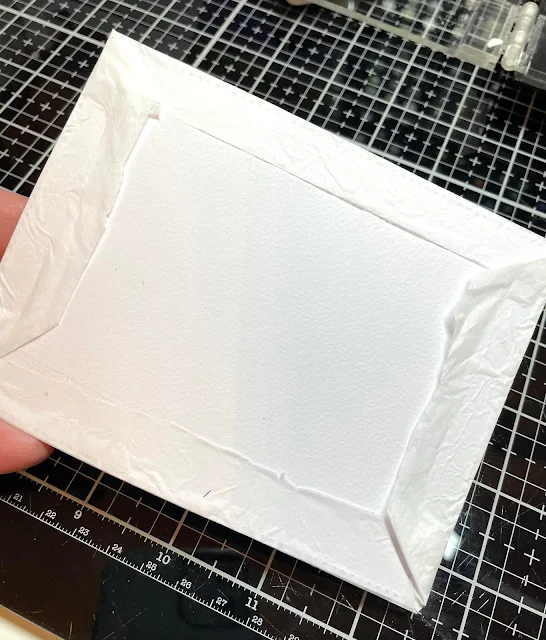
While that's drying, start your base layer of the card

by taking the second tissue paper and wrapping your card base layer.

Any adhesive or tape will do as you'll cover this part up.


Set that aside and go back to your stamped solid images.

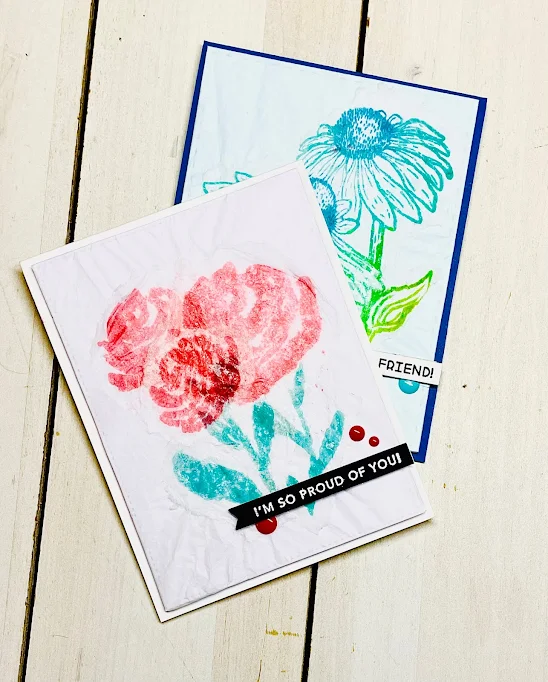
Start ripping /tearing around the image carefully so that you have

just the images along with a slight edge.


This part can be anything you want it to be - torn/ripped/missing a piece ...

it is perfectly imperfect and your OWN creation!


They should look something like this.

The idea is to create a layer.  This works best if you have multiples!

I always lay them out first to get an idea of where they will go ...

before gluing :)

You can use pixie spray or spray adhesive to add them to your card base.


Glue it down and add a sentiment/embellishment if you like!

I used the sentiment strips from Taylored Expressions

and added enamel dots and let the ripped paper be the focal point.


Here she is!


I don't have photos of the blue floral card

but it is in the video content on my YouTube channel.

That one is equally beautiful!

Such a fun technique and I hope you give it a try.

Here are the camp counselors and their class dates:

Monday/January 24th  ~ Jeanette @ Creativeplay 
Tuesday/January 25th ~ Kelly @ Sandcastlestamper
Wednesday/January 26th ~ Barb  @ inkingintoretirement
Thursday/January 27th ~ Darlene @ Accordingtobijou


I hope this made sense!

It's a fun way to create extra dimension and 'drama' to your cardmaking

and takes the tissue paper stamping a big leap further!

Each time you create this, it will always be unique and one of a kind.


Thanks for stopping in today!

Be blessed,

~Kelly


10.03.2021

One Plus Twelve - October!


Hello friends!


It's the 3rd of the month which means - One Plus Twelve ~ 

my favorite card series!


If you are new to my blog or the One Plus Twelve card idea,

it's simple!

Take one stamp - and just ONE stamp - and use it all year long,

once a month, twelve different ways :)

The idea came about when I realized I was buying and hoarding

using my stamps just once ... and I came up with this idea 

to stretch the use of my stamps and crafting supplies.


Each year, my stamp chooses me.

I've said that each year about my Word of the Year, too.

I tend to just settle in on one stamp that doesn't seem to let me go.

But I digress!


First, here's my card:


This series is a fun one but usually around this time of the year

I start really struggling with how to use the stamp differently.

For October, I wanted to go with oranges for fall and Fall-o-ween.

For 2021, my stamp is Altenew's build-a-flower magnolia,

my favorite flower!

I stamped it with Versamark first and then heat embossed my image.

 I blended with distress inks, blender brushes and embossing powder

and then added a sentiment after cutting the stamped image panel in 

half.  The sentiment is from My Favorite Things.


 I loved this technique when I made a previous card,

so if we love it, why not try it again - only differently!

My friends Barb and Jeanette are doing this challenge again this year

and you can see their cards on their blogs.


I really like this month's card :)

It's a wonderful technique, I love the bright colors for the season 

and it was fun to create!


And that's it for this month's One Plus Twelve!

Thanks so much for stopping by!