Showing posts with label lawn fawn. Show all posts

7.10.2025

Summer in Nantucket ...


Hi friends!

Welcome to summer in Nantucket!


This has been a fun-filled week of cardmaking with sharks

and coming up with fun ways to incorporate them into my creating.

This was an idea I *saw* in my head (ahem - first red flag!)

and when I went to actually make it ....

welp.


So, here's my we-just-stopped-by-the-giftshop-on-vacation postcard!

Kinda looks like the ones we'd get back in the day, right?!


Honestly, it's almost funny ... especially with the LIGHTHOUSE

in the MIDDLE of the ATLANTIC OCEAN.

Double ahem.


I used various Lawn Fawn stamp sets to create this fun card

and a theme of Red, White and Blue for my Wednesday 

card group on Instagram.

The ink blend was using Distress Oxide Inks and if you look closely,

I inverted the ocean with the darker 'bottom' on the top.

Totally meant to do that - YEP! :)


Thanks for stopping by!

~Kelly

3.05.2025

Carnival Fair!


Hi friends!

Today we're heading to the county fair! 😃 


This week, my Wednesday card group

 - Cards For All Seasons - 

has a fun theme of carnivals!

That could be anywhere from a literal carnival, county fair, 

to Mardi Gras and carnivals in other countries.

We even included masks, masquerades, ticket stubs or big tops

and even just fun carnival colors ~ and hopefully this inspires you, too!


I created a Fun Fair with carnival rides in honor of my 4 kids 💚

Their schools always had a fun festival every spring 

after the standardized testing period ended as way to celebrate

months of preperation and studying and test taking.

It was always grand and I made sure to always run one of the booths,

which we also made from scratch!


 For this cheerful card, I used 2 different Lawn Fawn stamps:

Admit One and Coaster Critters.

The background is blended with my distress inks

and I colored it with prismacolor markers.


Thanks for stopping by!


12.23.2023

Happy PAW-lidays!


Hi friends!


Wishing you a very Happy PAW-liday!


This was a fun card I created for an Instagram hop

 that I put togethera few months ago.

It was an eagerly awaited hop part 2 of the 

Spectacular Stamptember!

A group of friends and I were chatting about our love

of the Simon Says Stamp Stamptember sets

that we put our heads together for a fun hop!

AND we loved it so much,

we continued with a Winter theme: Winter Stamptember!


I used the Lawn Fawn and Simon Says Stamp collab set

Home for the PAWlidays 

and included a piece of patterned paper from Lawn Fawn 

for the 'snowy' background :)


This was a fun card to create ~

very "KELLY" with the bright colors and whimsy!

And we have 2 rescue pups so it warms my heart

knowing they have a FUR-ever home.


Thanks for stopping by!
~Kelly

11.23.2022

Easy Glue Printing - Wednesday Tutorial SCS!


 Hi friends!


Today I have the honor of being a guest designer

to host the tutorial of the week for Splitcoaststampers

so it looks like we'll be 'stuck' together for this one!


Hee hee!

I've made several samples (scroll, scroll away!)

and a whole video which you can see here:


It's fun, creative and easier than it looks!

You'll need some school glue (you know you got some!),

acrylic paints (or watercolors but mix them up THICK!)

and some cardboard (from all those Christmas packing you are getting!)

and this tutorial right here will help you create these amazing

backgrounds for your cards.


For this first card, I used tones of pink and peach for the background.

I added a tree from Tim Holtz Sizzix collection and added

it the front of the card as a focal point with a little sentiment.


The beauty of this technique is each one is unique

and different and none will ever be the same!


I've also kept the fun going and make a shaker card edition:

Here's a close up of the snow and the dimension

and for this card I've used Simon Says Stamp Gnome Peeking.

I stamped the trees and die cut those with the stamps and dies from the

SSS set and used one of my #inktober watercolor backgrounds.


No snow in Florida so I loved creating this shaker version!

And that's it for this one today :)


Thanks for stopping!

~Kelly


6.02.2022

CCEE2221 ~ Country Cookin' :)


Hey y'all!

Mighty nice to see ya today!

We're cooking up something country today at the 

CCEE Stampers blog!


Our sweet hostess, Lynn, is starting us off with the June challenges

and I'm sure it will be a fun month!

This is what she says:


 In the USA, June has been declared country cooking month. I am therefore asking the CCEE Stampers to create cards which feature fabulous bounty from the garden in the form of fruits or vegetables that you love to prepare and serve your family during the hot months of summer.


I LOVE vegetables!

I decided to create a card with my favorites: carrots :)


I grabbed a couple of Lawn Fawn stamp sets

and Lawn Fawn designer paper

and created this cute card ~ lots of sharing and lots of carrots!

I do not have a green thumb for gardening or harvesting or canning

but I am a self taught pretty good cook :)

Many friends and family around our table will attest to that

and based on how many 'repeat visitors' I get that lick their plates clean,

I'm guessing it must be true!

So win/win - LOL!


That's it for me, friends!

Please visit the CCEE Stampers blog to see all the DT cards

as well as link up yours!

Thank you, Lynn, for the fun challenge!

So pull out your stamp collection and see what you can put together for this country cooking challenge. Should you post your project to an on-line gallery other than your blog, please add CCEE2221 as a keyword on hashtag.


Crafty hugs,

Kelly

Entered to: SSS Wednesday Challenge - Little Critters

1.27.2022

Stamping Sisters Camp - Day 4!


 Hello friends!

It's Day #4 and the final day of the Stamping Sisters card camp :)

And today's camp counselor is Darlene <3


And WOW!

Did she ever save an AMAZING card tutorial/product for the end - 

talk about a big last camp HURRAH!


My post is a picture heavy one which shows how I made my

card and the elements of how it works from bulky to flat!

Darlene explains is beautifully in her blog post here

and I will show you my card ....

then, if you want to see all the photos, keep scrollin!


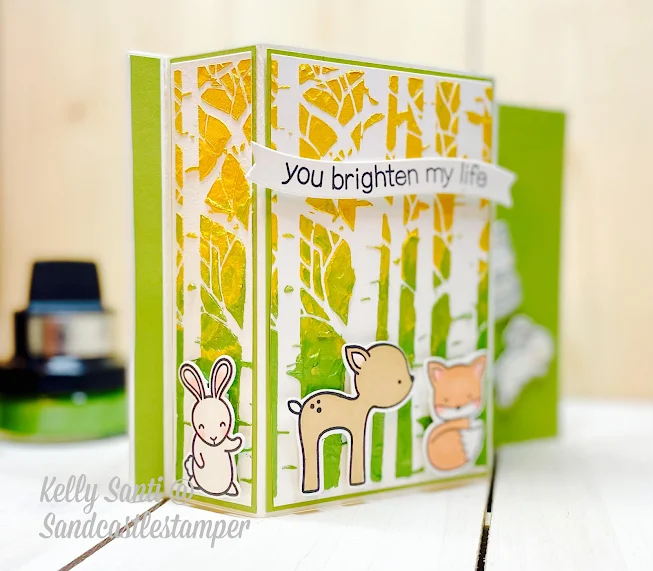
For my card based on her tutorial, I used the amazing gilding polish

that Darlene generously sent - THANK YOU, Darlene! 

She sent me a gorgeous vibrant green and yellow

and I was so excited to try these!


This is the first time I've ever used them so it was a bit of a learning curve,

but a good one.

I used a woodland stencil from TCW and wasn't sure how to use the polish

and ended up layering it on SUPER thick!

I did use spatulas but in case ya didn't know - the lid is a brush! :)~


It gave me some awesome texture though!

I'm not mad at it!

And I decided to add yellow for the golden hour sun peeking through

the woodland trees and in the middle, blending the two colors.

They kept saying it dries quick but 2 hours later, 

mine was still thinking about it, LOL!


Next up, I got to working on the card fold.

Per her directions, it's a 5 x 7 and is/like a bridge fold (I think?!)

but folds flat for mailing.

I had to wiggle mine just a wee bit as I realized my stencil was 4 x 4!

But I loved the result of the "woods" ....

the green with the burst of the golden sun peeking through the trees <3

Behold!


                 I used a few different Lawn Fawn sets to complete the look

and knew I wanted to add woodland critters.

I am over the moon with how this turned out

(even with a scandelous amount of hours to make it! gasp!)

This was an amazing card adventure -

one I would not have gone on had it not been for Darlene's amazing gift

AND her amazing card challenge tutorial.


Here's what it looks like flattened for mailing ....

('member Flat Stanley?  We'd squish him and mail him?!!)


I think the last tip

 - or how I made this one -

is the left side (by the waving bunny) is glued down with score tape.


The other side remains open so the recipient can read the card

and it tucks into place underneath the critter by the jumping bunny.


This was such a fun week ~ bringing camp 'home' since we can't 

get together again at this time.

Maybe one day soon!

Here is the line up of our week that we've posted each day,

the counselor of the day and the class we all taught.

It was certainly massive fun and

I'm already thinking up ideas for summer camp!


Monday/January 24th  ~ Jeanette @ Creativeplay 
Tuesday/January 25th ~ Kelly @ Sandcastlestamper
Wednesday/January 26th ~ Barb  @ inkingintoretirement
Thursday/January 27th ~ Darlene @ Accordingtobijou

Thanks for stopping by!

Be blessed!

~Kelly

1.25.2022

Stamping Sisters Camp - Day 2!


Hi there, friends!


Welcome to day #2 of the Stamping Sisters winter camp.

That means all 4 of us

(Barb, Darlene, Jeanette and myself)

will bring you a different class / card technique each day this week.


Today, I'm the camp counselor

and I call this cardmaking idea 

"Let's get RIPPED!" :)


This is a photo heavy post but if you'd like to see the video version,

feel free to click on my YouTube channel video here


The first thing you'll need is some cardstock - 

both an a2 size base and a quarter panel for the base layer

and 2 sheets of WHITE tissue paper.


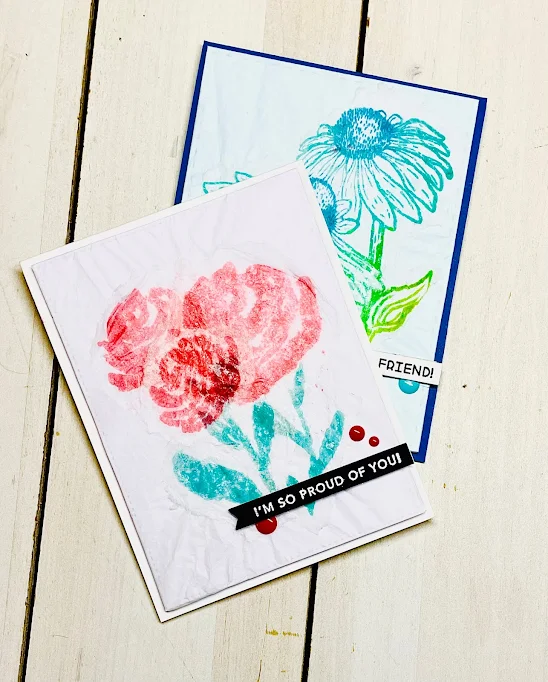
You'll need solid stamps and a couple colors of inks.  

Cubes are great since you'll be working in small spaces, nooks n crannies!


Once the images are all stamped out, let them dry for a minute or two.

While that's drying, start your base layer of the card

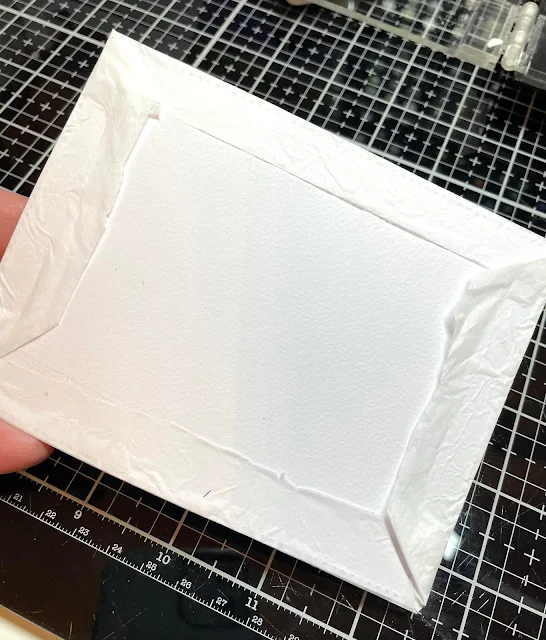
by taking the second tissue paper and wrapping your card base layer.

Any adhesive or tape will do as you'll cover this part up.


Set that aside and go back to your stamped solid images.

Start ripping /tearing around the image carefully so that you have

just the images along with a slight edge.


This part can be anything you want it to be - torn/ripped/missing a piece ...

it is perfectly imperfect and your OWN creation!


They should look something like this.

The idea is to create a layer.  This works best if you have multiples!

I always lay them out first to get an idea of where they will go ...

before gluing :)

You can use pixie spray or spray adhesive to add them to your card base.


Glue it down and add a sentiment/embellishment if you like!

I used the sentiment strips from Taylored Expressions

and added enamel dots and let the ripped paper be the focal point.


Here she is!


I don't have photos of the blue floral card

but it is in the video content on my YouTube channel.

That one is equally beautiful!

Such a fun technique and I hope you give it a try.

Here are the camp counselors and their class dates:

Monday/January 24th  ~ Jeanette @ Creativeplay 
Tuesday/January 25th ~ Kelly @ Sandcastlestamper
Wednesday/January 26th ~ Barb  @ inkingintoretirement
Thursday/January 27th ~ Darlene @ Accordingtobijou


I hope this made sense!

It's a fun way to create extra dimension and 'drama' to your cardmaking

and takes the tissue paper stamping a big leap further!

Each time you create this, it will always be unique and one of a kind.


Thanks for stopping in today!

Be blessed,

~Kelly


1.10.2022

New technique card/ video!


Hello friends!

Happy Monday!


 I hope your week is off to a good start :) 

I have a new video up on my YouTube channel 

making quite a mess a fun new technique card! 

One of the joy of papercrafting for me is being adventurous

 in my creating and having fun in the process.


I found a random wall tile in Dollar Tree

and originally attempted to use it as an embossing folder.

It didn't work!

I tried again, this time with distress oxide inks.

Even then, there was a bit of a learning curve!


All is well that ends well!

LOVING how this turned out .......

after all :)


I love for you to check out my channel and subscribe!

Thanks for your visit - and for watching!

Be blessed,

Kelly

1.06.2022

Conversation Hearts - Shaker Style!


Hi friends!

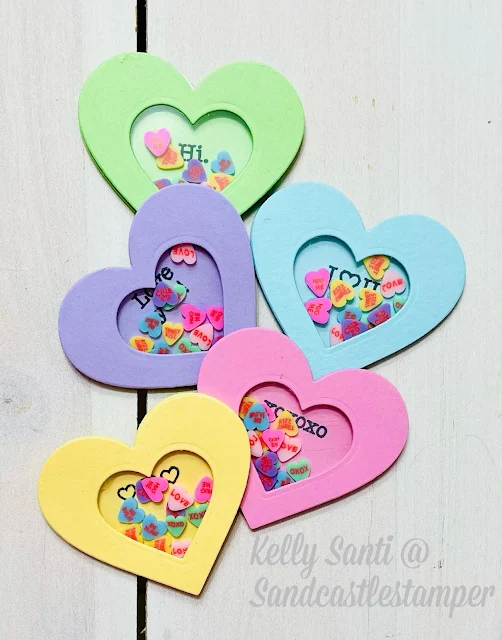
If you remember conversation heart candies, raise your hand!


Me!


I always looked forward to those on Valentines,

reading each of the little words like they were secret spy messages.


U R Cool!

Be Mine!

Cutie!

You Rock!


So SO CUTE!


I have a new video up on my YouTube channel

for handmade embellishments :)


It's an open collaboration where many of us will create them

to have on hand for the many needed occasions - 

shopping our stash and building our supplies of ephemera!


I used my Hero Arts infinity heart dies

and die cut a bunch of little hearts in 3 sizes

in the colors that coordinated with the real candies.

The shaker element:  acetate behind the top heart

and a layer of foam in between for depth and height.

I filled each of the shakers with shaker mix 

after stamping the bottom cardstock layer with sentiments 

from Lawn Fawn's  Just My Type stamp set.


There are so many hearts left, I'll be able to make quite a few

card candies / embellishments / ephemera!


Thanks so much for your visit today!

Be blessed :)

~Kelly


11.04.2021

CCEE2144 ~ Manatee Awareness Month!


 Hi friends!


It's officially November and a brand new month

for challenges at the CCEE Stampers blog.

This month, I'm the hostess for the challenges

and will bring you themes for the next 4 weeks!

So swim on by and play along! :)


November is Manatee Awareness Month so let's celebrate

 Florida's beloved, iconic marine mammal by adding one 

(or more) to a card.

I've used Manatee-rific from Lawn Fawn

and just love the sweetness of these little creatures.

They are often called 'sea cows' as they are slow moving

mammals with puffy, round bodies and paddle-shaped flippers.

They are gentle and friendly and considered vunerable

so let's keep these beautiful ocean animals safe

and celebrate with manatee cards.


The base of my card is acrylic paint with a piece of 

chipboard dipped into the paint

and flattened onto the #120 cardstock.

Once it was dry, I added the 'waves' with a scallop die.


You can find the CCEE Stampers blog here

and Mr. Linky at the bottom to connect your cards.


Have fun and thanks for stopping by!