Showing posts with label Taylored Expressions. Show all posts

2.11.2026

The CRAFTY Spotlight - February


Hi friends!

Today I'm sharing a floral card featuring Doodle Flowers

from Taylored Expressions, a blast from the past!


My monthly card group The Crafty Spotlight

hosted by my dear friend, Kim,

chooses a company to 'spotlight' each month.

February = anything TE!


I chose this stamp so I could get a little coloring in!

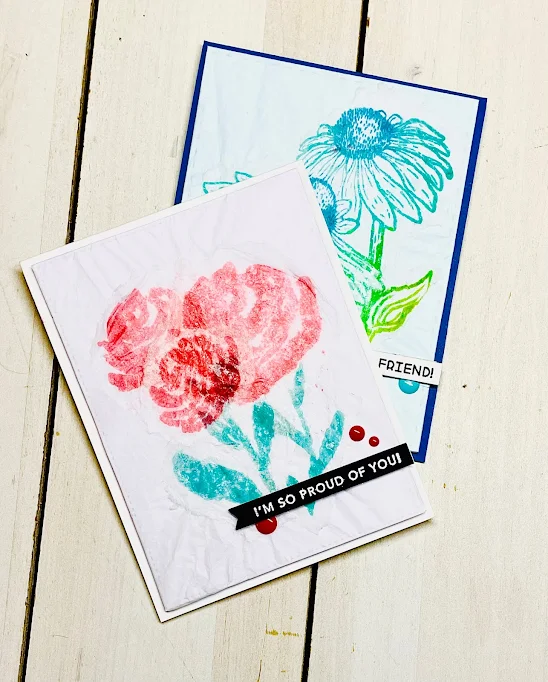
I made 2 different cards, one 5 x 7 and one A2 standard

and mixed up the florals just a little bit.


Although the challenge is to spotlight Taylored Expressions,

I did chose a sentiment from another company

that fit the needs of the card :)


We'll be back next month with another mystery image reveal!


Thanks for stopping by!

~Kelly


Entered to:  A Cut Above - use one die cut (sentiment!)
The Neglected Stuff - AG (from 2020!)

6.23.2025

It's a Kell-of-a-mess: June!


Hi friends!


It's time for another edition of Kell-of-a-mess!

This is a spin off of a creative vision I had years ago

to create any card/project with a MESSY theme.

A very busy life kept me away for a bit but I'm back and 

oh. the. ideas. I. have!


This month, I have a collab!


Here's a quick recap of the process shortened into 40 seconds!

-


My granddaughter was visiting and wanted 'to do the art things!'

No doubt she is my grandchild!

But in true Kelly form, I couldn't let her leftover paint go to waste.

I recycled it by dipping heavyweight (this part is important!)

cardstock into the paint and let it dry.  

Distress watercolor cardstocks are perfect, too!


For best results, let is dry overnight and then stamp directly onto it.

I used Taylored Epxressions Daisy Dreams stamp and die set.

This has been in my stash awhile and never gets used!


After die cutting and building a card base,

 3 incredibly unique and fun card blossomed!


Again ~ messy but fun!

I absolutely adore the idea of being able to USE something

instead of just TOSS IT in the trash :)

Here they are together:


Thanks for stopping by!


Challenges:  Neglected Stuff Challenge - Old Paints and forgotten stamp

Pammies Pinky Inkies - AG

Path of Positivity - AG


3.04.2025

Spring is here! It's smell AWFUL!


Hey friends!


Today I'm sharing a hilarious card for my friend Geeta's 

Giggle Group!


I have been on a major purge and while destashing my stamps,

found some that I'd forgotten that I had.

This Big Grumpy from Taylored Expressions has been with me for years.

I had so much fun sorting through the accesories stamps,

like Easter and Halloween!


I used the flower pot from the Easter set 

and ended up taking the potted plant

 and trimming it so I'd have just the flowers. 

 Grumpy is sitting in a garden!


Thanks for stopping by!


3.09.2024

3M: Big Blooms Lily


Hi friends!

Today's card share is for the 3M card sharing

(3 Musketeers) 

 where we have 1 stamped image, 3 creators!


If you are a new reader to my blog, 

you can see how it all begin here!

The 3M group is Barb, Jeanette and myself and we take turns

 - once a month - 

sending each other a 'mystery' stamped image.


For March, the hostess is Barb and she sent us this gorgeous

Big Blooms Lily from Taylored Expressions.


Here's my take!


Be sure to see what Barb and Jeanette created with this image, too

and their cards on on their blogs today.


Thanks for stopping by!


~Kelly


1.25.2022

Stamping Sisters Camp - Day 2!


Hi there, friends!


Welcome to day #2 of the Stamping Sisters winter camp.

That means all 4 of us

(Barb, Darlene, Jeanette and myself)

will bring you a different class / card technique each day this week.


Today, I'm the camp counselor

and I call this cardmaking idea 

"Let's get RIPPED!" :)


This is a photo heavy post but if you'd like to see the video version,

feel free to click on my YouTube channel video here

 ↓


The first thing you'll need is some cardstock - 

both an a2 size base and a quarter panel for the base layer

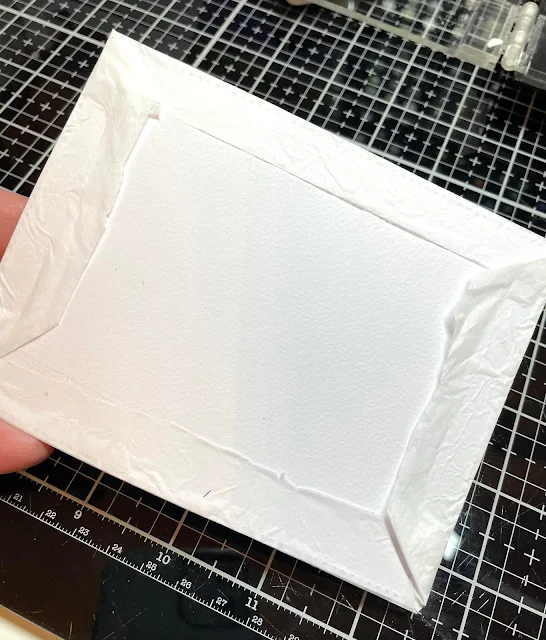
and 2 sheets of WHITE tissue paper.


You'll need solid stamps and a couple colors of inks.  

Cubes are great since you'll be working in small spaces, nooks n crannies!


Once the images are all stamped out, let them dry for a minute or two.

While that's drying, start your base layer of the card

by taking the second tissue paper and wrapping your card base layer.

Any adhesive or tape will do as you'll cover this part up.


Set that aside and go back to your stamped solid images.

Start ripping /tearing around the image carefully so that you have

just the images along with a slight edge.


This part can be anything you want it to be - torn/ripped/missing a piece ...

it is perfectly imperfect and your OWN creation!


They should look something like this.

The idea is to create a layer.  This works best if you have multiples!

I always lay them out first to get an idea of where they will go ...

before gluing :)

You can use pixie spray or spray adhesive to add them to your card base.


Glue it down and add a sentiment/embellishment if you like!

I used the sentiment strips from Taylored Expressions

and added enamel dots and let the ripped paper be the focal point.


Here she is!


I don't have photos of the blue floral card

but it is in the video content on my YouTube channel.

That one is equally beautiful!

Such a fun technique and I hope you give it a try.

Here are the camp counselors and their class dates:

Monday/January 24th  ~ Jeanette @ Creativeplay 
Tuesday/January 25th ~ Kelly @ Sandcastlestamper
Wednesday/January 26th ~ Barb  @ inkingintoretirement
Thursday/January 27th ~ Darlene @ Accordingtobijou


I hope this made sense!

It's a fun way to create extra dimension and 'drama' to your cardmaking

and takes the tissue paper stamping a big leap further!

Each time you create this, it will always be unique and one of a kind.


Thanks for stopping in today!

Be blessed,

~Kelly


1.24.2022

Stamping Sisters Camp - Day 1!


Hello sweet friends!

Welcome to my blog and Day #1 of winter camp!
For the next 4 days, we 4 friends (Barb, Darlene, Jeanette and myself)
will be bringing you a 'class a day' with a fun, interesting,
and definitely unique technique!


We are sharing it to inspire YOU as well!
Maybe it's something you are familiar with
or will be seeing for the first time ~ like me!

This is our camp class line up:

Monday/January 24th  ~ Jeanette @ Creativeplay 
Tuesday/January 25th ~ Kelly @ Sandcastlestamper
Wednesday/January 26th ~ Barb  @ inkingintoretirement
Thursday/January 27th ~ Darlene @ Accordingtobijou


Jeanette gave us these directions:  The idea to feature embossing folders came to me as I was organizing (and purging) my huge collection of embossing folders. I realized I rarely ever use them. It is time they see some action so I knew for my challenge, three things had to be present...

1. The embossing folder/s MUST be the star of the card.

2. No stamped images are allowed on the card.

3. Sentiments are optional.


Today's class is taught by Jeanette and 
I was today years old when I learned AND tried luster rub on! :)

My set of luster rub on paints were definitely full of shimmer and sparkle
and I ended up buying a set that was a little brighter and colorful.
Because of that, I dug through my embossing folders
fully intending at first to do a floral 
(since the yellow/red/greens lended to that)
BUT it was absolutely hideous.
I had a house full of people, cooking, talking, laughing
and just absolutely could not think of another way to make it work.
So I tossed it, went back to the drawing board
(as they still ate, talked, laughed!) and thought 
Outdoors!
Grass, sun, sunburst!


And a ta-da moment was born ........
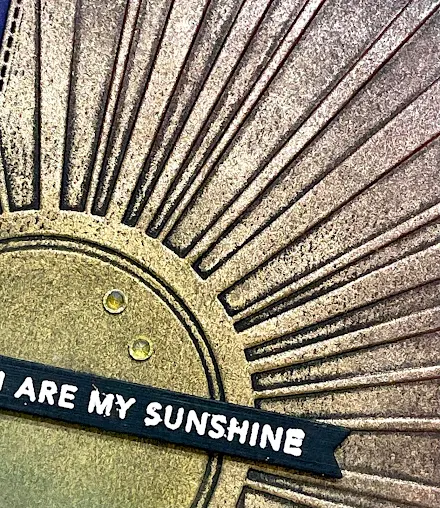
I used a Taylored Expressions starburst embossing folder
and white embossed a sentiment to match.
At first I used my blending brushes (da junky ones!
the luster is absolutely messy!)
but then just switched to my hands and did RUB it ON, as the name says!

And I. was. out. of. black. cardstock!

SO!
I used dark purple :)

This card is just okay - not my favorite but not my worst ;)
Definitely a learning curve!

As you can see from my pots, this stuff goes all over!
I need to wipe it down but it was get this up and blogged, first!


And that's it for Camp day #1!
I hope I get at least a C+ :)

This was fun!
Try it out!

And come back tomorrow - I'm the teacher.
Er'body gets an A!

Hugs!
~Kelly

1.10.2022

New technique card/ video!


Hello friends!

Happy Monday!


 I hope your week is off to a good start :) 

I have a new video up on my YouTube channel 

making quite a mess a fun new technique card! 

One of the joy of papercrafting for me is being adventurous

 in my creating and having fun in the process.


I found a random wall tile in Dollar Tree

and originally attempted to use it as an embossing folder.

It didn't work!

I tried again, this time with distress oxide inks.

Even then, there was a bit of a learning curve!


All is well that ends well!

LOVING how this turned out .......

after all :)


I love for you to check out my channel and subscribe!

Thanks for your visit - and for watching!

Be blessed,

Kelly

12.29.2021

Mission (IM)Possible ~ Star bright!


Hello friends!


Today's card is for the Mission  Impossible Possible 

quarterly-ish card group

where we receive a mystery item from a hostess

and then create a card with the item!


This mission's mystery item was a beautiful star bright stencil

from Spellbinders and it was sent to both Barb and I from Jeanette.

She also  purchased one for herself and

 we 3 have the same stencil to create our own versions of cards.


Mine probably should have been a candidate for the Hot Mess card!

I started by taking  a sheet of watercolor cold press paper

and did a dry flat wash using Altenew watercolors.


Once it was dry (several hours naturally), I used the Spellbinders

Star Bright stencil over the top, my ranger distress inks and blending 

foam brushes from Scrapbook.com.

The last creative part was a dusting of ultra fine glitter after 

pouncing the stencil and paper with versamark.


This card has a great New Year's flair with the sparkle and shimmer!

I added the string for a bit more drama 

and as a reminder of how we always have streamers and horns 

that blow strings each New Year's celebration :)

The sentiment is from Taylored Expressions simple strips Crafty

stamped in Memento Tuxedo Black Ink.

You can see Barb's card here 

and Jeanette's card here.


I'm up next Mission and the item I'll be sending them found me last week!

Honestly, I'm a little scared, LOL!

But a challenge it is!

Stay tuned for that mission -

 coming to a blog near you in the Spring '22!


Thanks for stopping by today!

6.17.2021

RSG ~ Golden Anniversary


Hi friends!


I'm still playing catch up on my cards as my month of June

confused itself with July 

and just sort of popped like a firecracker! :)


This is my card that I created for the Ready, Set, Go challenge

but wasn't home to create it on the day it was due.

Jeanette is the hostess and her challenge represents our 50th card,

hence, the title Golden Anniversary.

This is her challenge and then I'll explain my card :)


Because there are three of us, my challenge called for using three of something on our cards –   three colors, three layers, three designer papers, three whatever.

 The cards were also to include something on  that starts with the first letter of each of our names – so something that starts with a K, something that starts with a B and something that starts with a J.
Oh, and one more thing… because this is our Golden Anniversary,
 I wanted to see some GOLD on our cards.


First, here is my card:


I've been enjoying sharing cards for the #lovewins Instagam hop

and I've been finding creative ways to encorporate the theme

into most of my cards this month - like this one.


For my 3's, I used 3 heat embossed words and layers to the card.

For the letter B = black cardstock, my base layer of this card.

J = jewel tones colors of the glitter cardstock and 

thank you to my daughter, Victoria, who said 

"Your card looks like a kaleidoscope of color!"

And there you have it ... K = kaleidoscope.

Finally, for the touch of gold, I substituted gold for yellow in the rainbow.


You can see Barb's card here

and Jeanette's card here - posted on the day they were due :)

Meanwhile ...... me  ↓


Here's a final look 

and details over on my Instagram!


"Love one another" ~ It's really simple :) 

Thanks for stopping by!